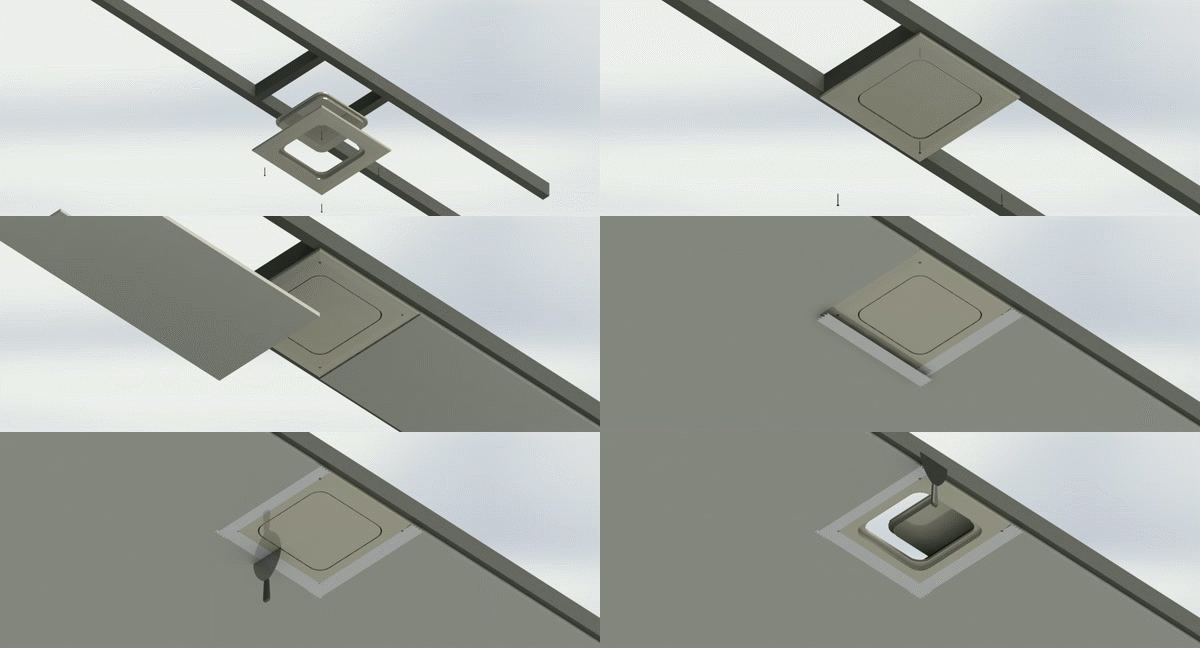
Access Panel Installation Guide
Drywall access panels are designed to provide easy access to important internal areas inside of walls or ceilings.
These are useful in a wide range of commercial and residential settings. These access doors offer a flat, attractive and nearly invisible access option that can be made to suit any home or office design.
So, with that in mind, here is how to install access panels in your home or office.

Access Panel Installation Video
01/
Do Your Research
First and foremost, find the exact spot in your drywall you need to gain access through. Whatever you're looking for, ensure you know where it is. This is per plans and coordination may be required with other trades.
Then, make sure you've got all the right materials. Keyhole saws, paint, compound, screws, and adhesive tape are all going to come into play. Make sure you've got them on hand before you start.
Measure, then mark your openings.
02/
Get It Pre-Cut
Prefab access panels like Phantom Panels are a great option and need to be installed with the drywall, to studs / framing.
These ready-made doors are a breeze to install and come made in variety of sizes. The best part about them, though, is simply that they look great.
03/
Start Small
The best way to check your measurements is by simply making a small pilot cut into the drywall.
Do this at the point where you'd find the fixture, using your drywall saw. This gives you a target to work around, moving forward and allows you to adjust to the thickness of the wall before getting started in earnest.
04/
Trace Your Steps
Using the measurements you made earlier, place your panel against the wall and make a second marking by tracing the panel itself.
This should give you an outline within your original outline, affirming your placement.
This is an important last step, though it might seem overly cautious. After you start cutting, next, it's extremely difficult to stop, so make sure you've covered all of your bases.
05/
Make The Cut
Using your drywall saw, cut slightly outside of the traced outline you just made. This doesn't need to be any more than a quarter of an inch, on each side.
The reason for this extra width is that the access panel's frame needs a little more space on all four sides, in order to fit properly.
06/
Start Fitting In
The next step in learning how to install access panels is making sure your frame fits snugly into the brand new hole you've just made in your drywall. This is called a dry fit.
Test-fit the frame into the cavity. The idea here is to make sure it fits into the cut-out. If the fit is too tight, use your saw to cut thin edges from the hole to make it bigger.
It's important to be careful, during this process, because you don't want to cut so much away that the hole is too loose around your frame.
07/
Screw It In.
Using #6 drywall screws, drill through the embedments on all four sides of the frames. Two screws, each one inch away from the corner and in the center of the frame. The screws should go directly into light gauge studs. Apply the same torque and installation as typical drywall.
08/
Mud, Tape, and Sand
Fill the tape fin with compound and let dry.
Next, sand down and apply additional coats as necessary for the drywall level finish required.
09/
Paint
Finish with a coat of primer to match your wall or ceiling, and additional coats of paint per project specifications.
In commercial construction, the painting trade will typically handle this stage. The doors can be painted entirely however you want to ensure that it does not seal the door to the frame.
10/
Admire the Finished Product
The final product should look like a completely natural part of your wall or ceiling.
If you have any questions on how to install or regarding the product, reach out to UP Ceilings today: CONTACT.
Your product is covered under the best warranty in the industry.

